Sharing Files and Folders Securely
The pagekite.py program comes with a built in HTTP server which can be used to test static websites, or simply share files and folders over the web.
This how-to will briefly discuss how to use the built in server to share files and how to balance security vs. usability to suit different situations.
Benefits
The main advantages to using PageKite for distributing sensitive data, is that the recipients do not need any particular tools aside from a modern web browser. Since the files are never stored "in the cloud", the privacy and confidentiality of the transmission can be tuned to suit even the strictest security policies.
By streaming files on-demand to the intended recipients, the risk of leaks or accidental or malicious disclosure is lowered significantly: the potential window of attack is limited to only the time when PageKite is actually running and connected. By further using PageKite's built in URL obfuscation, passwords and encryption features security can be boosted even further.
Basic file sharing
Sharing a single file can be done from the command line, like so:
pagekite.py /path/to/filename KITENAME.pagekite.me
This will make the file available for download on the path: https://KITENAME.pagekite.me/filename (it will also be available on the equivalent unencrypted http:// path).
You can also share multiple files at once, by naming them one-by one or by using the shell's wildcard expansion:
# Share multiple files
pagekite.py file1.txt file2.txt file3.txt KITENAME.pagekite.me

# Share all HTML files from a folder
pagekite.py /some/folder/*.html KITENAME.pagekite.me
Finally, you can share the contents of an entire directory (folder), including sub-directories, just by naming it. If you add the +indexes flag, people will be able to easily browse the contents:
# No browsing, but shares all contents
pagekite.py /path/to/folder KITENAME.pagekite.me

# Browsing enabled (directory indexes)
pagekite.py /path/to/folder KITENAME.pagekite.me +indexes
Access controls
Access to the shared files can be restricted in various ways.
The most basic, is to simply give the files hard-to-guess URLs. PageKite can do this for you, if you use the +hide flag:
# Generate randomized URLs
pagekite.py /path/to/stuff KITENAME.pagekite.me +hide
This will generate a random 9-character prefix for each shared directory.
You can also require a username and password for access, or only accept connections from specific IP-addresses or /24 netblocks:
# Require username and password
pagekite.py /path/to/stuff KITENAME.pagekite.me +user/NAME=PASS

# Restrict by IP address or network block
pagekite.py /path/to/stuff KITENAME.pagekite.me +ip/1.2.3.4
pagekite.py /path/to/stuff KITENAME.pagekite.me +ip/4.5.6
All of the above can of course be combined, and you can specify multiple usernames or multiple IP addresses to grant access to by adding more flags.
Note: Be advised that the IP-based restrictions are based on information provided by the front-end relay server, which could potentially be forged. If you do not trust the person running your front-end relay or suspect they may have been compromised, you should not rely on IP-based access controls alone.
Automatic *.pagekite.me encryption
If you are using the PageKite service and sharing files using a kite name ending in .pagekite.me, you will automatically be able to use secure HTTPS URLs for your shared files. This method is compatible with all browsers and should protect you from casual eavesdropping on shared public WiFi or by most Internet providers.
This encryption has a couple of limitations:
-
The front-end relay itself has access to the unencrypted data stream, which means a compromised relay server could intercept, monitor and modify your communications.
-
If your adversaries are very powerful (a government), they may be able to obtain fake certificates for the
.pagekite.medomain and intercept your communications that way.
End-to-end encryption
If you are using an untrusted front-end relay, or simply want to guarantee you are communicating in the most secure manner possible, it is possible to use end-to-end HTTPS encryption with PageKite. This will guarantee that no intermediaries, including the operators of the front-end relay servers, will be able to listen in on your communications.
In order to make use of end-to-end HTTPS encryption, you will need an SSL certificate for your kite's domain. In this how-to we will only discuss self-signed certificates, as they can be obtained for free and are, when used properly, the most secure type of certificate.
As of version 0.5.4, pagekite.py can generate a self-signed certificate for you (assuming the openssl tool is installed on your computer), making this a relatively straightforward process:
# Share files with a self-signed certificate
pagekite.py --selfsign /path/to/files https://KITENAME.pagekite.me
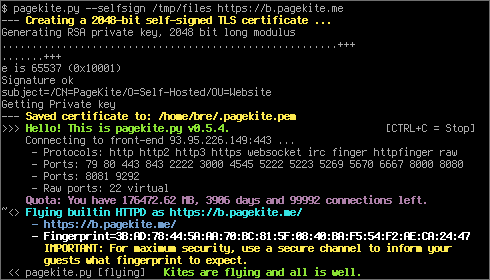
Compared to the above examples, there are two differences: one is the --selfsign argument, which must be first, and the second is the https: prefix on the kite name. The first time you run this command, the output will look something like this:

On subsequent runs, the program will re-use the generated certificate (until you delete the .pagekite.pem file).
For maximum security, combine this with the access controls discussed above and turn the program off when you are finished exchanging files.
Notes:
-
Enabling end-to-end HTTPS encryption in this way only works with the built in HTTP server, and will disable unencrypted access to your kite.
-
End-to-end encryption relies on browsers supporting the SNI extension of the Transport Layer Security standard. This should work with all recent browsers, but older versions of Windows (XP or earlier) or older versions of Internet Explorer, lynx, wget and Konqueror are known to have problems.
-
You may need to educate your recipients on how to navigate their browser's security systems. Teach them to check the fingerprint and verify they have the right certificate before adding a security exception for your kite.
-
The Certificate Patrol Firefox extension is a useful way to detect man-in-the middle attacks and forged certificates.
-
If you want to use your own certificate, create a file named
.pagekite.pem(orpagekite.pemon Windows) in the same folder as your configuration file. It should contain your site's private key, followed by the signed certificate.


Comments
Keep up the good work